
The Auctria Admin App lets you check in guests, record sales, bids, and donations, and check out guests from your phone or tablet on event night.
The app runs on iOS and Android phones and tablets. Volunteers can use their own phones, so every volunteer can act as a check-in desk or checkout station.
This page shows you how to get the app running. Event administrators can then set up card payments in Admin Setup.
Get Started
Steps
- Install the Auctria Admin App on your phone or tablet.
The Auctria Admin app provides an overview of your fundraising events and allows you to check in and check out your participants right from your mobile device.

Scan the QR Code above to install the app for your mobile device.
- Open the app.
- Enter the Email and Password you use to sign in to the Auctria dashboard.
- Tap Login.
- If the app asks for a verification code, check your email for a 6-digit code. Enter it and tap Verify.
- If you belong to more than one organization, tap your organization under Select an organization.
- Tap your event under Select an event.
The app opens to your event's Home screen.
Stay Signed In
Check Stay logged in on the sign-in screen so you don't have to sign in again during the event.
More Sign-In Options
| Option | Description |
|---|---|
| Device nickname | A name for this device, such as Check-in 1. It is optional, but it helps you tell devices apart when several people use the app at one event. |
| Forgot password? | Opens the Auctria password reset page in your browser. |
| Resend code | Sends a new verification code if the first one expired. |
| Use a different email | Returns to the sign-in screen so you can sign in with another account. |
Getting Around the App
Use the navigation bar at the bottom of the screen to move between the main sections.

The navigation bar at the bottom of the app.
| Section | What You Do There |
|---|---|
| Home | See a live summary of your event. |
| Check-in | Find and check in guests. |
| Checkout | Find guests with a balance and take payment. |
| Record | Record bids, sales, and donations. |
Home
The Home screen shows your event's status at a glance. The cards are for reference only. To check in or check out guests, use the navigation bar.
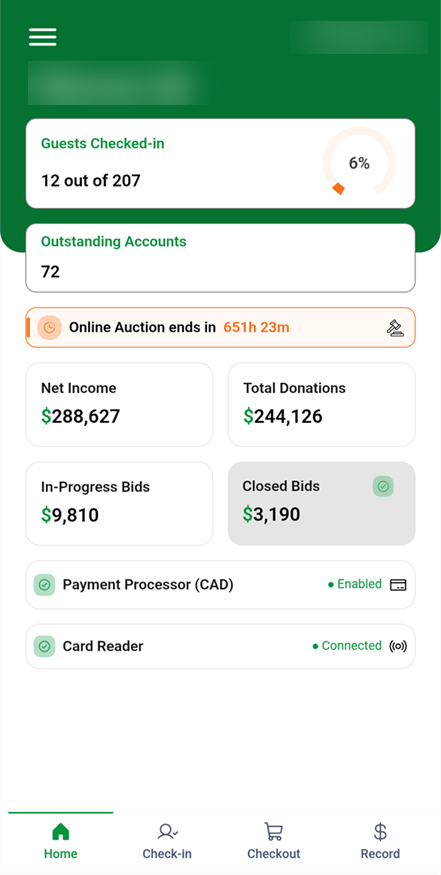
An example Home screen from a demonstration event.
| Card | What It Shows |
|---|---|
| Guests Checked-in | How many guests are checked in, out of the tickets sold (or out of all guests if there are no ticket sales), with a percentage. |
| Outstanding Accounts | How many guests still have a balance. |
| Online Auction ends in | A countdown to the end of the online auction, or its end date. |
| Payment Processor | Enabled with your currency, or Disabled. |
| Card Reader | Connected or Not Connected. |
Event Administrators See More
Event administrators also see Net Income, Total Donations, In-Progress Bids, and Closed Bids. Volunteers don't see these cards.
If Payment Processor shows Disabled, an event administrator needs to set up the payment processor on the dashboard. If Card Reader shows Not Connected, see Admin Setup.
Record
Record has three tabs.
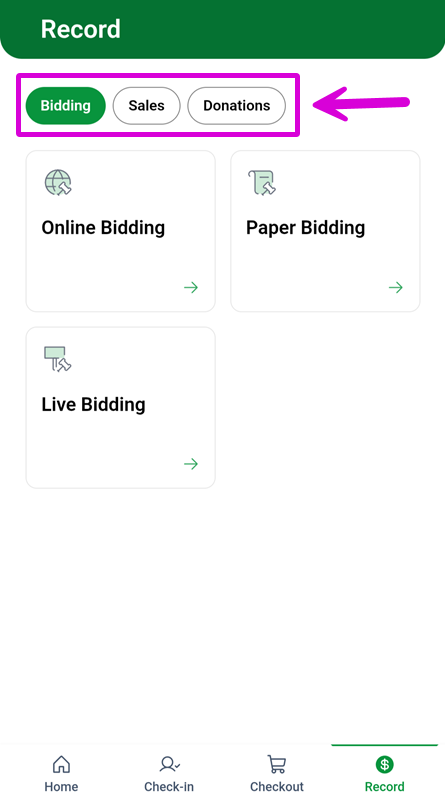
The Record screen, with its Bidding, Sales, and Donations tabs.
| Tab | What You Can Record |
|---|---|
| Bidding | Online Bidding, Paper Bidding, and Live Bidding |
| Sales | Raffle Ticket, Sponsorship, Admission Ticket, and Others |
| Donations | Dessert Dash, Paddle Raise, and Other Donations |
For step-by-step instructions, see Admin App Sales, Admin App Bids, and Admin App Donations.
Side Menu
Tap the menu button (☰) at the top of the screen to open the side menu and manage the app itself.
| Option | Description |
|---|---|
| Change Event | Switch to another event in your organization. |
| Settings | Check the app's connection status and set up a card reader. |
| Logout | Sign out of the app. |
Event Night Tasks
Each page below walks you through one event night task, in the order most events use them.
| Task | Page |
|---|---|
| Check in guests | Admin App Check-In |
| Scan a guest's QR code | How To Scan QR Codes At Check-In |
| Save a guest's card at check-in | Admin App Check-In |
| Sell tickets, raffles, and other items | Admin App Sales |
| Record bids and auction winners | Admin App Bids |
| Record Paddle Raise, Dessert Dash, and other donations | Admin App Donations |
| Check out guests | Admin App Checkout |
Admin Setup
Complete this section before event night. Volunteers don't need to do these steps.
Stripe Required for Card Payments
Card payments in the Admin App only work when your organization uses Stripe. If Stripe isn't connected, the app shows a message that credit card functionality is only enabled with Stripe. See How To Connect A Stripe Account.
Choose a Card Reader
Each device that takes payments needs a reader. Pick one per device.
| Reader | Works On | Extra Hardware |
|---|---|---|
| Tap to pay | Supported iPhones and Android phones | None. The phone is the reader. |
| Bluetooth reader | Phones and tablets, including iPads | A Stripe card reader. See Credit Card Readers And Swipers. |
Tap to pay accepts Visa, Mastercard, American Express, and Discover contactless cards. It also accepts Apple Pay, Google Pay, and Samsung Pay.
Device requirements for Tap to pay:
| Device | Requirement |
|---|---|
| iPhone | iPhone XS or later, running iOS 16.7 or later (varies by country). See Stripe's iPhone supported devices. |
| Android | Android 13 or later, with NFC and other hardware requirements. See Stripe's Android supported devices. |
| iPad | Not supported. Use a Bluetooth reader. |
| Android tablet | Most aren't supported. Check Stripe's Android list for your model, or use a Bluetooth reader. |
Card Details Aren't Saved
Tap to pay payments don't save the guest's card details in Auctria. To keep a card on file, tap Add Credit Card on the guest's Guest Info step during check-in. See Admin App Check-In.
Set the Terminal Location
Stripe requires every reader to be registered to a physical address. By default, Auctria uses the address on your organization's details.
To use a different address, go to Credit Cards → Credit Card Readers on the dashboard and update the Location section.
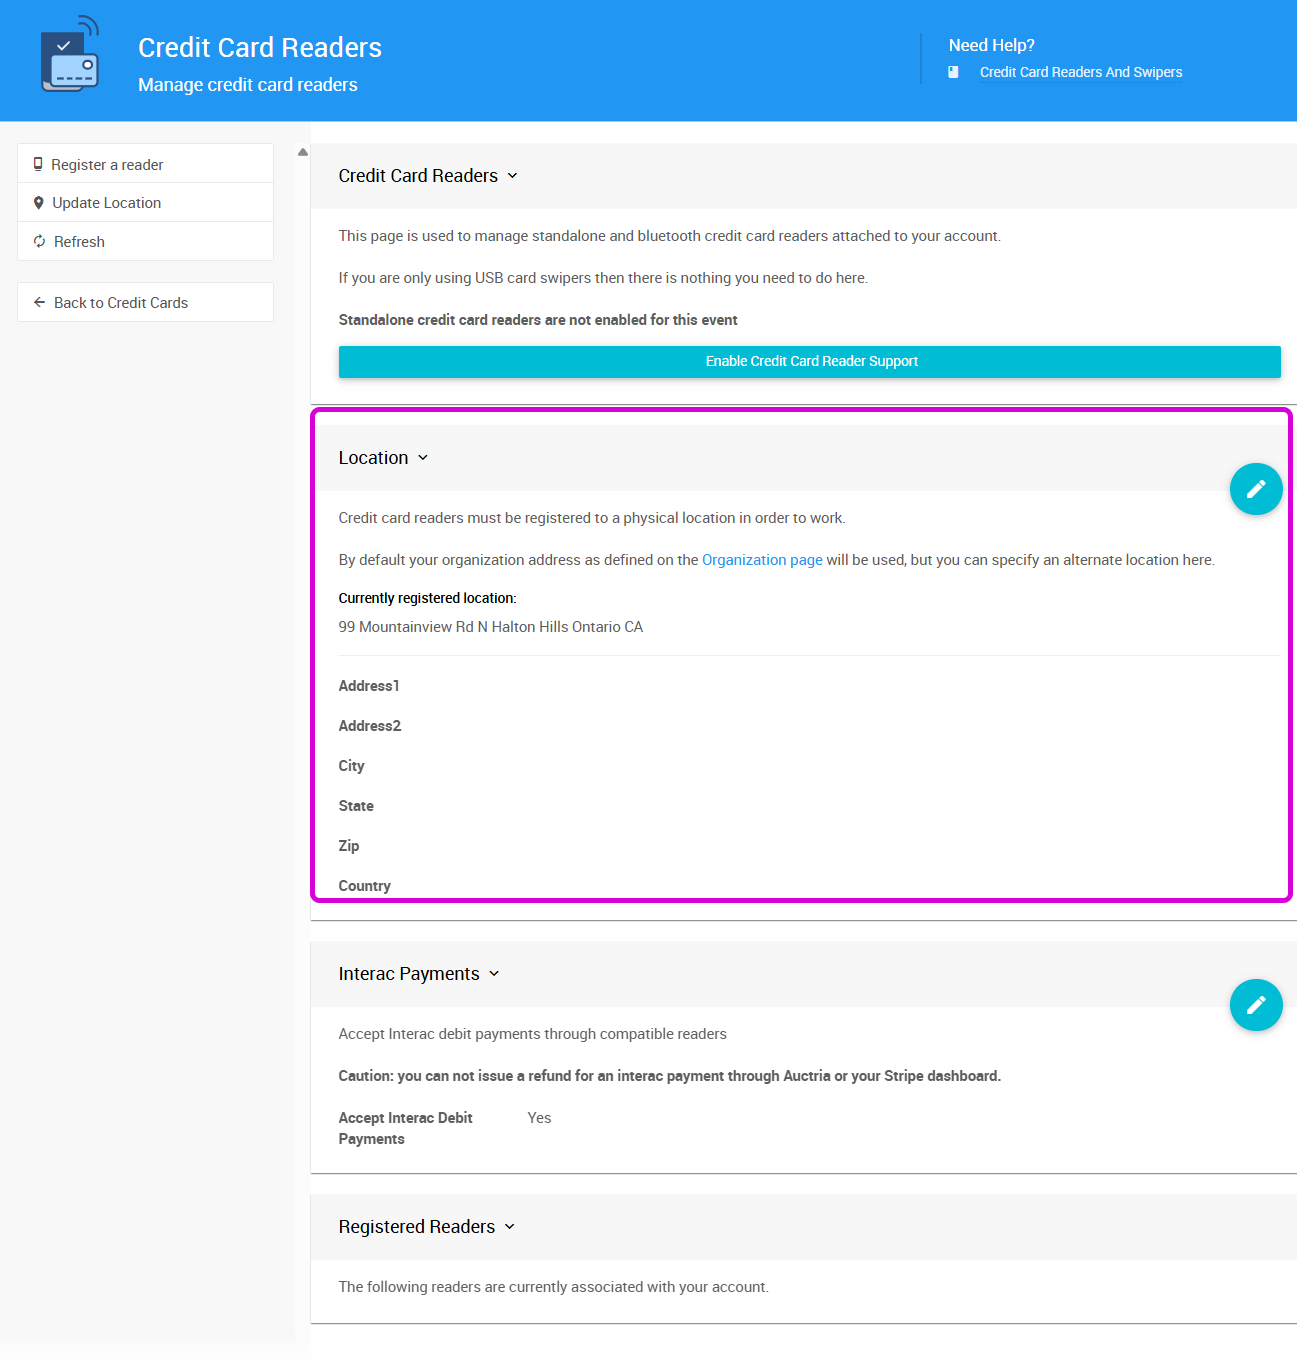
The Location section of the Credit Card Readers page from a demonstration event.
If no location is set when you set up a reader, the app asks you to add one. Enter the address on the Add Terminal Location screen and tap Save.
Set Up Tap to Pay
- Open the side menu and tap Settings.
- Under Status, tap Reader.
- Tap This iPhone or This Android device.
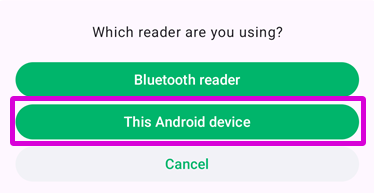
Choosing This Android device to set up Tap to pay.
- If prompted, accept Apple's terms and conditions.
- Wait for the message that Tap to pay was configured successfully.
Remove the Phone Case
If cards don't register when tapped, remove the phone case and try again.
Apple Confirmation Email
When you set up Tap to pay on an iPhone, Apple sends a confirmation that a Tap to Pay device was added to your Apple ID. This is expected.
Set Up a Bluetooth Reader
- Charge the reader and turn it on.
- Open the side menu and tap Settings.
- Under Status, tap Reader.
- Tap Bluetooth reader.
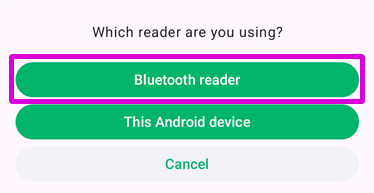
Choosing Bluetooth reader to pair a card reader.
- Allow the app to use Bluetooth and location when asked.
- Tap your reader in the list. If it isn't listed, tap Add new device to search for it.
- Give the reader a name and tap Add.
- Tap Connect.
Let Firmware Updates Finish
The reader may install a required Stripe update when it connects. Don't turn off the reader or move it away from the device until the update finishes.
Label Your Devices
Put a physical label on each phone and reader that matches the name you gave it in the app. This makes it easier to track who has which device during the event.
Check the App's Status
The Settings screen shows whether the app is ready to take payments.
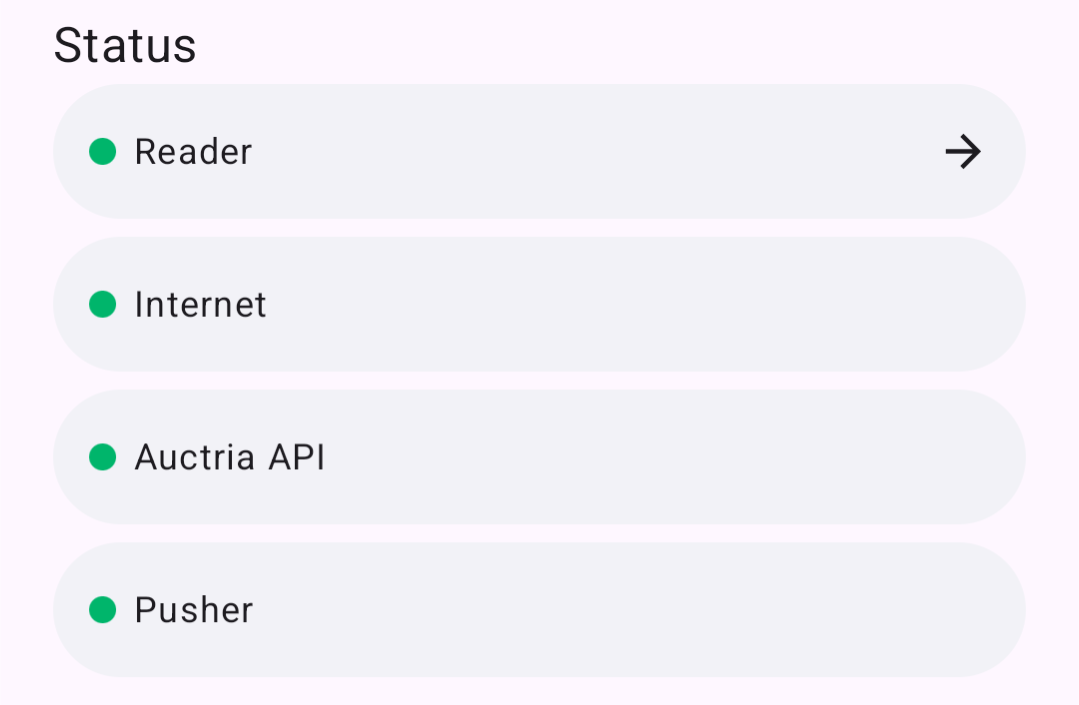
The Status section of the Settings screen.
| Status | What It Checks |
|---|---|
| Reader | A card reader is set up and connected. |
| Internet | The device is online. |
| Auctria API | The app can reach Auctria. |
| Pusher | The app can receive live updates. |
The screen also shows your name, email address, device ID, and app version. Share the version number with Auctria Support if you need help.
Troubleshooting
| Problem | What To Try |
|---|---|
| The app says credit card functionality is only enabled with Stripe | Connect a Stripe account. See How To Connect A Stripe Account. |
| The app asks for a terminal location | Add the address in the app, or update Location on the Credit Card Readers page. |
| Internet or Auctria API isn't connected | Switch between Wi-Fi and mobile data, then check Settings again. |
| The app says permissions are missing | Tap Request permissions and allow each one. If you denied them before, allow them in your device settings. |
| The reader disconnects after the phone locks | Turn off the lock screen or set a long timeout. A locked phone can drop the reader connection to save power. |
| The Bluetooth reader isn't in the list | Make sure it's charged and on, keep it close to the device, then tap Add new device. |
| Tap to pay doesn't read cards | Remove the phone case and tap the card again. |
| The app returns to the sign-in screen | Your session expired. Sign in again, then reconnect your reader in Settings. |
Video: Admin App Introduction
Watch the Video and Read the Transcript
This video shows an earlier version of the app. Some screens and steps have changed. For example, tapping a card on the Home screen no longer opens Check-in or Checkout.
Auctria Admin App - Introduction
Auctria Academy Training Series
Hello, and welcome to the Auctria Academy Training Series! This video will help you prepare for your Event Night with the Auctria Admin App.
Auctria's Admin App gives event organizers complete control over guest check-in and check-out with a tap on their mobile devices.
Let's learn how to set up the Admin App and start streamlining our Event Night!
Downloading The Admin App
The Auctria Admin App is available for iOS and Android devices and can be used on smartphones and tablets.
You can download the Auctria Admin app from the App Store or Play Store. Alternatively, you can visit the Admin App page in the Auctria User Guide and scan the QR code to download the app to your device.
Once installed, the app is in your device's library. Tap the Auctria Admin App icon to open it.
Signing In
To sign in, enter your email address and then the password for your Auctria account. This is the email address you or your organization used to sign up for Auctria.
You can leave the Nickname field blank.
Once you have signed in, you will see the Home page for your event. If your organization has multiple events, you may need to select the event during sign-in.
The home page displays live information about your event, including the number of guests checked in, any outstanding accounts, and financial information like Total Donations, in-progress bids, and the event's Net Income.
Tap the number of guests in the checked-in box to open the Check-In page and see your list of guests. You can also tap the Check-in button at the bottom of the screen.
Tap Outstanding Accounts to open the Checkout page and see the guests whose accounts still have a balance owed. You can also tap the Checkout button at the bottom of the screen.
Tap Home to return to the home screen.
Changing Events
To change your current event, tap the hamburger menu (three horizontal bars) on the top left of the screen, then tap Change Event.
Next, tap to select the new event from the list to open the event in the Admin App.
Setting Up Card Reader
When a Stripe account is connected, the Auctria Admin App can turn your smartphone into a Tap-to-Pay reader or connect to a Bluetooth card reader.
Please note that tablets and iPads cannot currently be configured as Tap-to-Pay devices and would need a Bluetooth reader. For detailed hardware requirements, please refer to our User Guide page about Card Readers and Swipers.
To set up your device as a Tap-to-Pay card reader, open the hamburger menu on the top left of the screen and tap Settings. This will open the Settings menu.
Under the Status section, you will see an option for Reader. If your device has not been configured as a card reader, the dot on the left will be red.
Tap-to-Pay Reader (Phone)
Tap the Reader option.
The app will ask which reader you want to use. Choose This iPhone/This Android Device, which will initiate configuring your device as a card reader.
You may be prompted to accept terms and conditions from Apple to set this up.
Once this process is complete, you will see a message that Tap-to-Pay has been configured successfully.
Bluetooth Reader (Tablets)
While iPads and tablets cannot be configured as Tap-to-Pay devices, you can still accept payments through the Auctria Admin app by pairing a Bluetooth card reader.
Before starting the pairing process, ensure your Bluetooth card reader is charged and powered on.
From the Settings menu, tap the Reader option and select the Bluetooth reader option. You may be prompted to allow the app to access Bluetooth devices, which must be granted for pairing.
Select your device's name from the list, or if you don't see it in the options listed, tap Add new device to search for it.
When you connect to a Bluetooth reader, a firmware update dialog may appear. Stripe requires these updates, and you should let the process finish—do not turn off the reader or move it away from the phone.
Once the device has been paired, you will see a confirmation screen. Now, you can accept card payments with your iPad or tablet!
Outro
The Auctria Admin app is designed to elevate your Event Night and streamline check-in and checkout. For more information about using the Auctria Admin app on Event Night, check out the rest of our Academy Training Series videos!